Hello planty friends!
Q. What Is Propagation?
A. Propagation is the process of creating a “clone” of the original plant by cutting off a piece and making it its own plant.
Merriam Webster defines it as…
Increase (a kind of organism) in numbers
Q. Why Should You Propagate?
A. Propagation is a great way to share the joy of gardening. With this valuable skill you can duplicate your plant to share, sell, trade, or grow.
How to Propagate Monstera Deliciosa?
Propagation is a necessary skill for any plant parent. These instructions will be specific to Monstera Deliciosa, but can be applied to any plant with a similar structure. Of course every plant is different and some varieties are more prone to root rot than others (ahmm Thai Constellation), so always use your best judgment.
Monsteras are typically easy to propagate. They have thick strong roots that grow rapidly from easily visible nodes. I’ve had success using water, perlite, and leca to do this.
Follow the three steps below:
Look for nodes and cut
Root cutting
Transfer to soil
Look for Nodes and Cut
You will see a bump on the main stem.
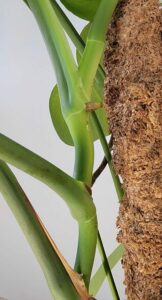
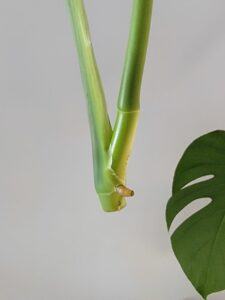
This bump may look like a small root poking out. You want about an inch of stem around this area. This is where the new roots will grow out of. Cut the plant leaving about an inch or two around the node.
You now have an unrooted cutting. This is a very precarious state for your plant because it does not have any roots. Roots hydrate and ground your plant. Your job now as a plant parent is to encourage root growth.
Root Cutting
You’ll want to create a moist environment with water and air.
I have had great success by simply placing the cutting in a glass of water.
You can also add perlite or leca. These are substrates that increase oxygen to the root system. This will help your plant transfer to soil more easily.
Many people also root with sphagnum moss, but I’ve had mixed results so I’ll focus on methods that work really well for me.
As your plant is rooting you’ll want to be on the lookout for rot, and if it appears cut it off. It will be brown and VERY mushy. You can avoid this by flushing the water regularly (1x a week).
Option 1: Root with Water
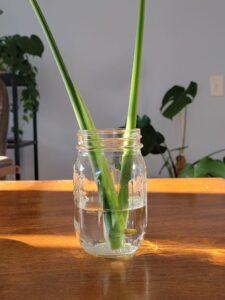
Fill a jar with just enough water to cover the node area. Place your cutting in the jar, find a sunny spot, and wait.
Make sure your plant is in a sunny window so that it has lots of energy to grow. The roots grow pretty rapidly, and you should have a significant amount after a few weeks. Once there’s enough you can pot it into soil or transfer to a more permanent hydro setup.
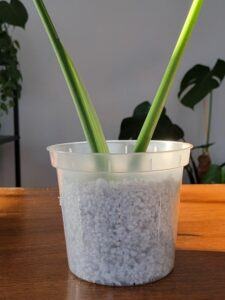
Option 2: Root with Water & Perlite
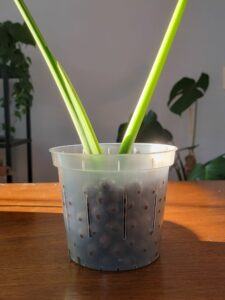
You will need perlite, an orchid pot, and a cover pot.
Fill your orchid pot ⅓ full with perlite, position your plant in the pot, and fill to the top with perlite. Thoroughly rinse with water. Some of the smaller pieces of perlite will fall out of the pot, but this is fine, just make sure to have a way to stop it from going down the drain. Place it in your cover pot. Add water until it is about ½ way up the orchid pot when submerged in water.
Flush the perlite and change the water about once a week, and roots will start growing over the next few weeks.
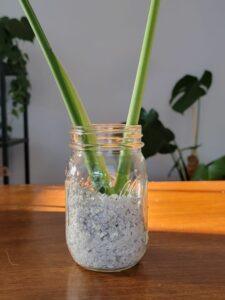
Option 3: Root with Water & Leca
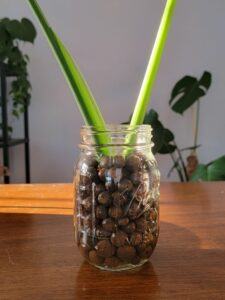
You will need leca, an orchid pot, and a cover pot.
Follow the above directions for rooting with water and perlite. It’s literally the exact same steps, except you should rinse your leca before using it.
Transfer to Soil
Now that your plant has roots, it is ready to be transferred to soil. You need to make this transition for the long-term health of your plant. It will be fine in water for some time, but it won’t have the energy to put out large new grown, and will eventually become a zombie and die. You can keep it in a permanent hydroponic system by using and leca and added nutrients.
I like to use an airy soil mixture. This can be done by combining large, chunky pieces into your soil base and additives (orchid bark , charcoal, pumice, etc.). You’ll want to make sure to keep the soil a little extra moist the first week or two after you plant it. You can find all my favorite products for soil on my favorites page.
Now you have a new plant!
Give the plant a couple weeks to settle in, and it should be right on its way to growing big and strong. This is a plant you can now grow, trade, gift, sell, or whatever your heart desires.
Happy planting!
Disclosure: PlantyFriend.com may get commissions for purchases made through links on this website. Don’t worry though, we only post links to items we love!
Pingback: canadian pharmacy no prescription